A guide to building, deploying, and scaling a serverless application on AWS
Introduction
In this tutorial, I’ll walk you through building TaskFlow — a fully serverless task management application using AWS. We’ll cover everything from architecture design to production deployment, including:
- Setting up a complete serverless backend with Lambda, API Gateway, and DynamoDB
- Deploying a modern frontend with S3 and CloudFront
- Configuring a custom domain with Route 53 and SSL certificates
- Automating everything with AWS SAM (Serverless Application Model)
By the end, you’ll have a production-ready application that costs less than $5/month for low traffic and scales automatically to handle millions of requests.
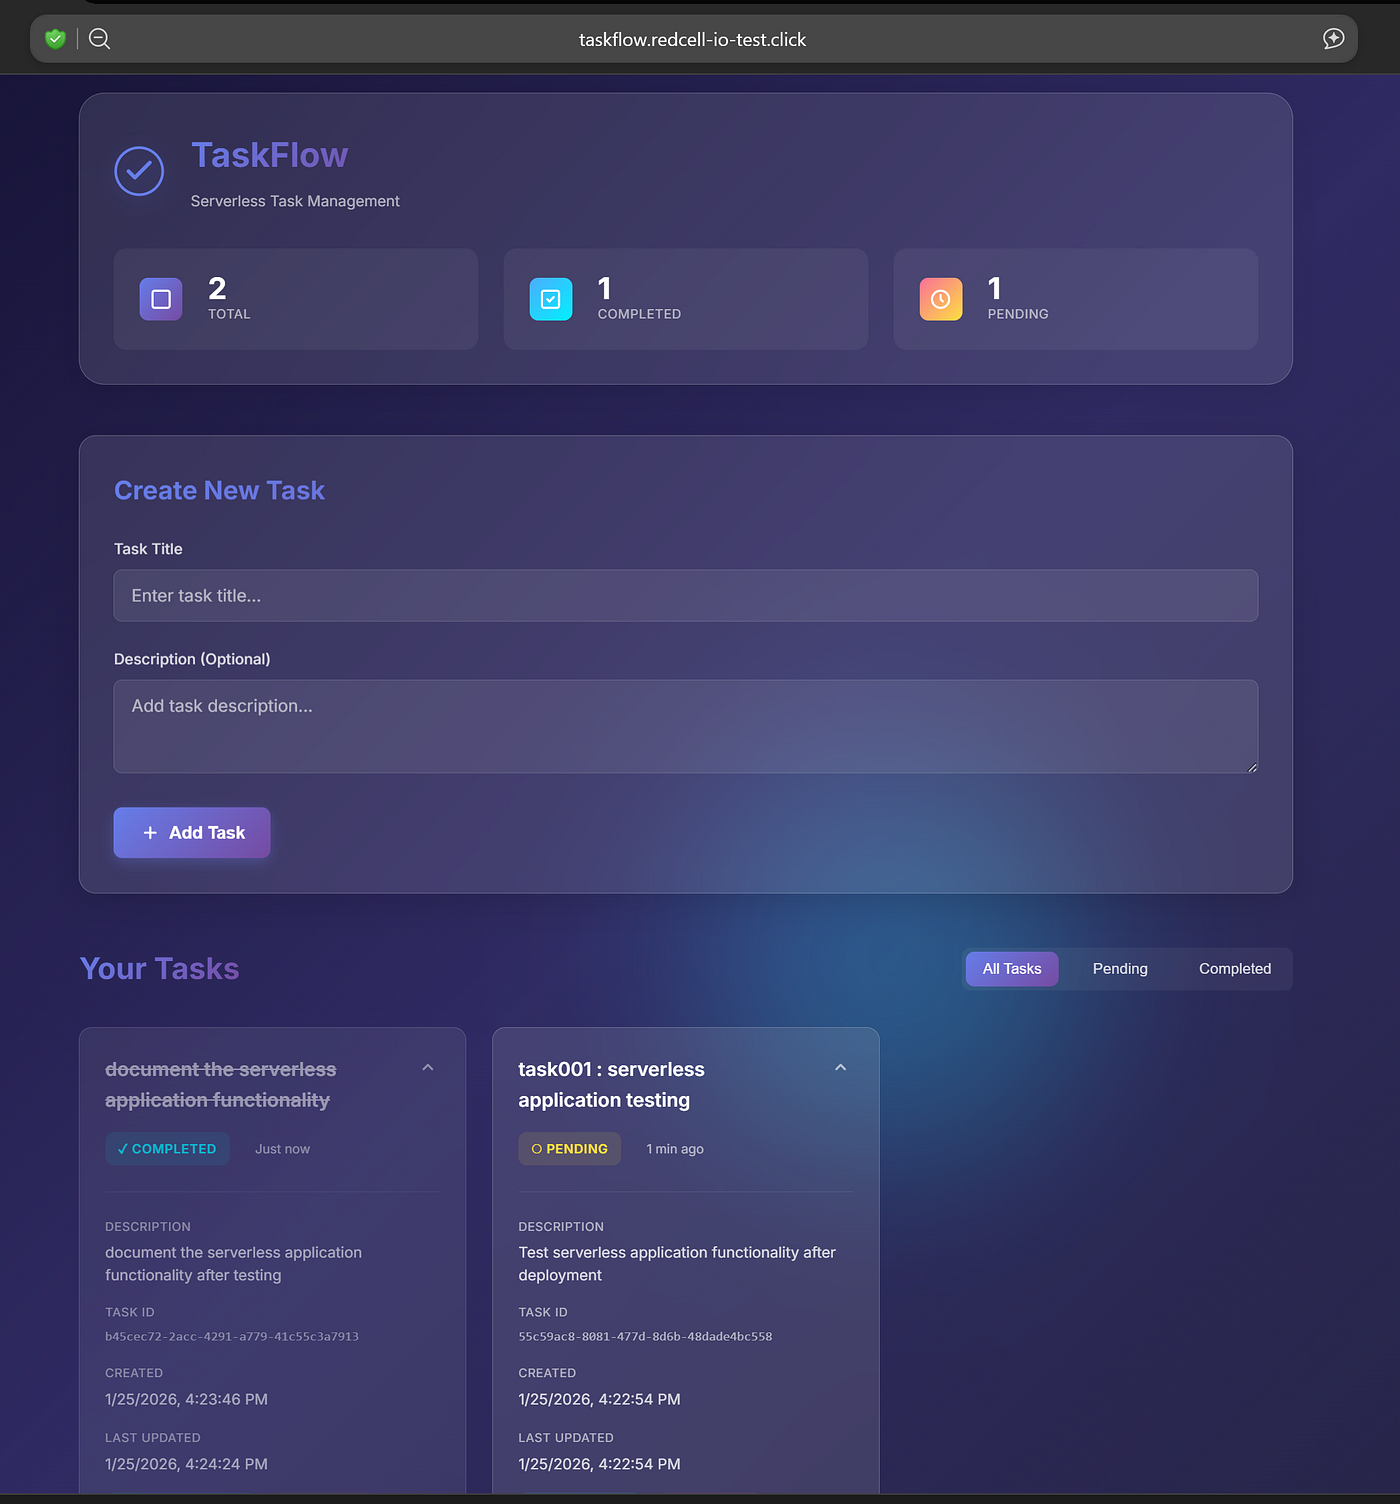
Tech Stack:
- Backend: AWS Lambda (Node.js 20.x), API Gateway, DynamoDB
- Frontend: Vanilla JavaScript with Glassmorphism UI
- Infrastructure: AWS SAM, CloudFormation
- CDN: CloudFront with custom domain
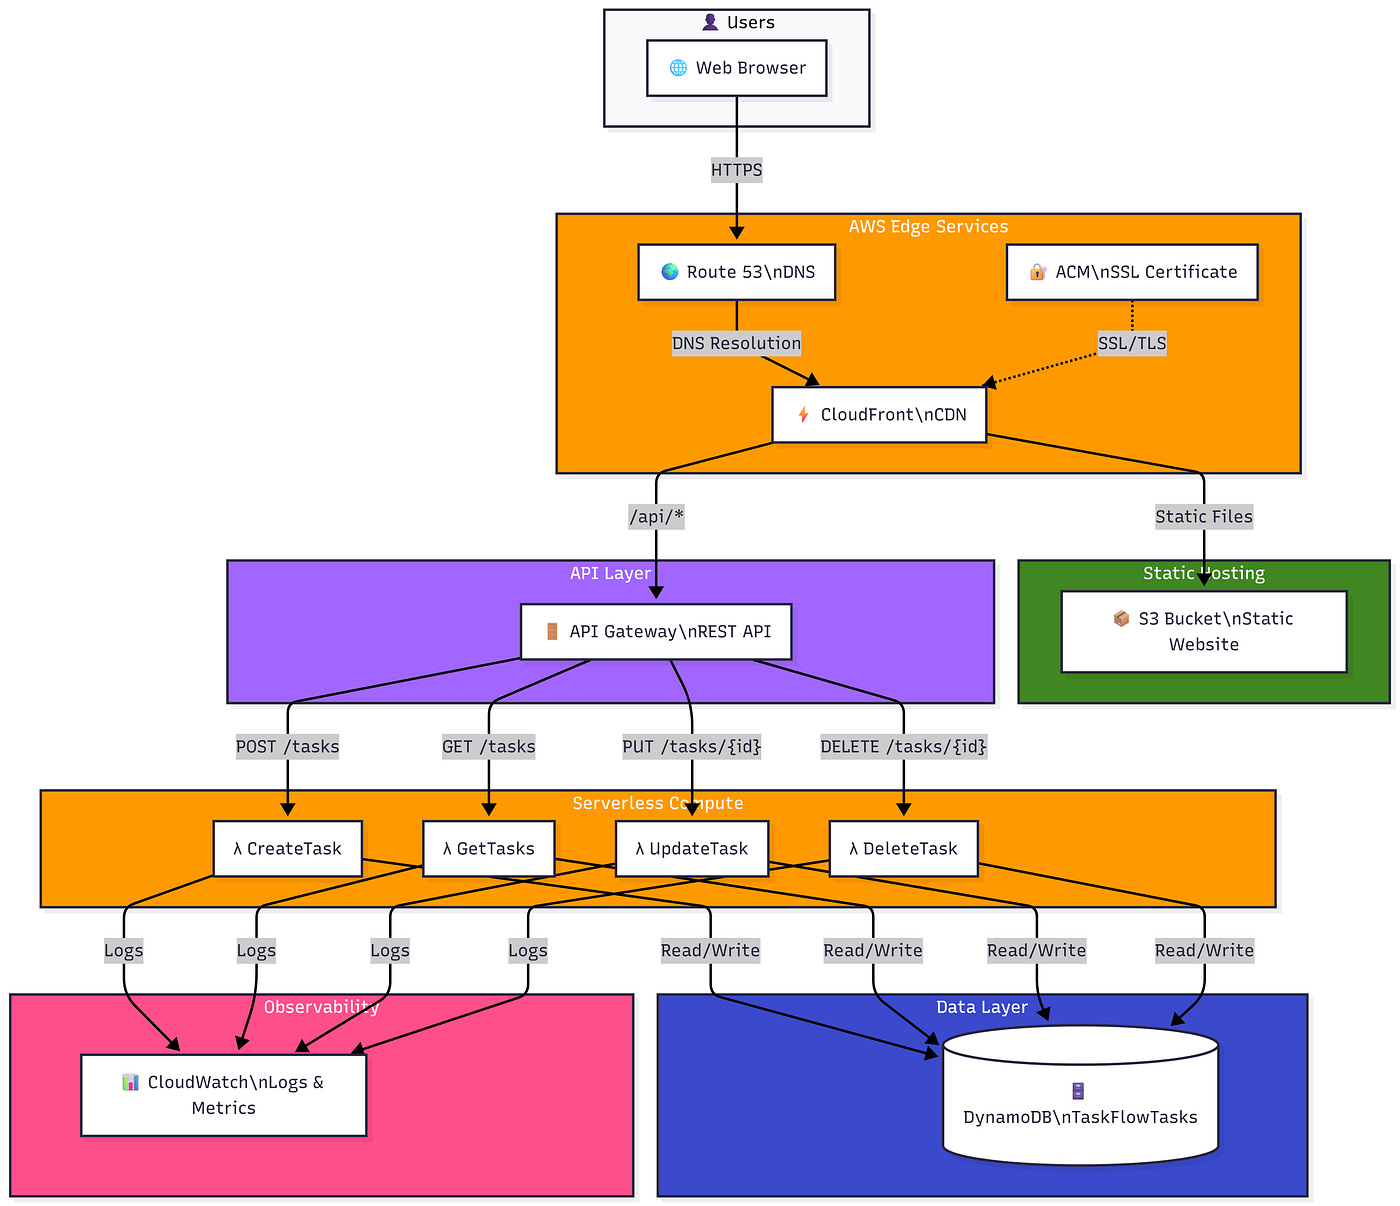
Why Serverless?
- Zero server management — No patching, no scaling configuration
- Pay-per-use — Only pay for actual compute time
- Auto-scaling — Handles 1 or 1 million requests seamlessly
- High availability — Built-in across multiple availability zones
Project Structure
aws-serverless-app/
├── frontend/
│   ├── index.html
│   ├── css/styles.css
│   └── js/
│       ├── app.js
│       ├── api.js
│       └── config.js
├── lambda/
│   ├── createTask/
│   ├── getTasks/
│   ├── updateTask/
│   └── deleteTask/
├── template.yaml          # SAM template
├── deploy.sh              # Deployment script
└── .env                   # Configuration
Step 1: Setting Up the Infrastructure
The SAM Template
AWS SAM (Serverless Application Model) is an open-source framework that makes it easy to build serverless applications. Here’s our infrastructure definition:
AWSTemplateFormatVersion: '2010-09-09'
Transform: AWS::Serverless-2016-10-31
Description: TaskFlow - Serverless Task Management
Globals:
  Function:
    Runtime: nodejs20.x
    Timeout: 30
    MemorySize: 256
    Environment:
      Variables:
        TABLE_NAME: !Ref TasksTableResources:
  # DynamoDB Table
  TasksTable:
    Type: AWS::DynamoDB::Table
    Properties:
      TableName: !Sub TaskFlowTasks-${Environment}
      BillingMode: PAY_PER_REQUEST
      AttributeDefinitions:
        - AttributeName: taskId
          AttributeType: S
      KeySchema:
        - AttributeName: taskId
          KeyType: HASH  # API Gateway
  TaskFlowApi:
    Type: AWS::Serverless::Api
    Properties:
      StageName: !Ref Environment
      Cors:
        AllowMethods: "'*'"
        AllowHeaders: "'*'"
        AllowOrigin: "'*'"  # Lambda Functions
  CreateTaskFunction:
    Type: AWS::Serverless::Function
    Properties:
      CodeUri: lambda/createTask/
      Handler: index.handler
      Policies:
        - DynamoDBCrudPolicy:
            TableName: !Ref TasksTable
      Events:
        Api:
          Type: Api
          Properties:
            RestApiId: !Ref TaskFlowApi
            Path: /tasks
            Method: POST
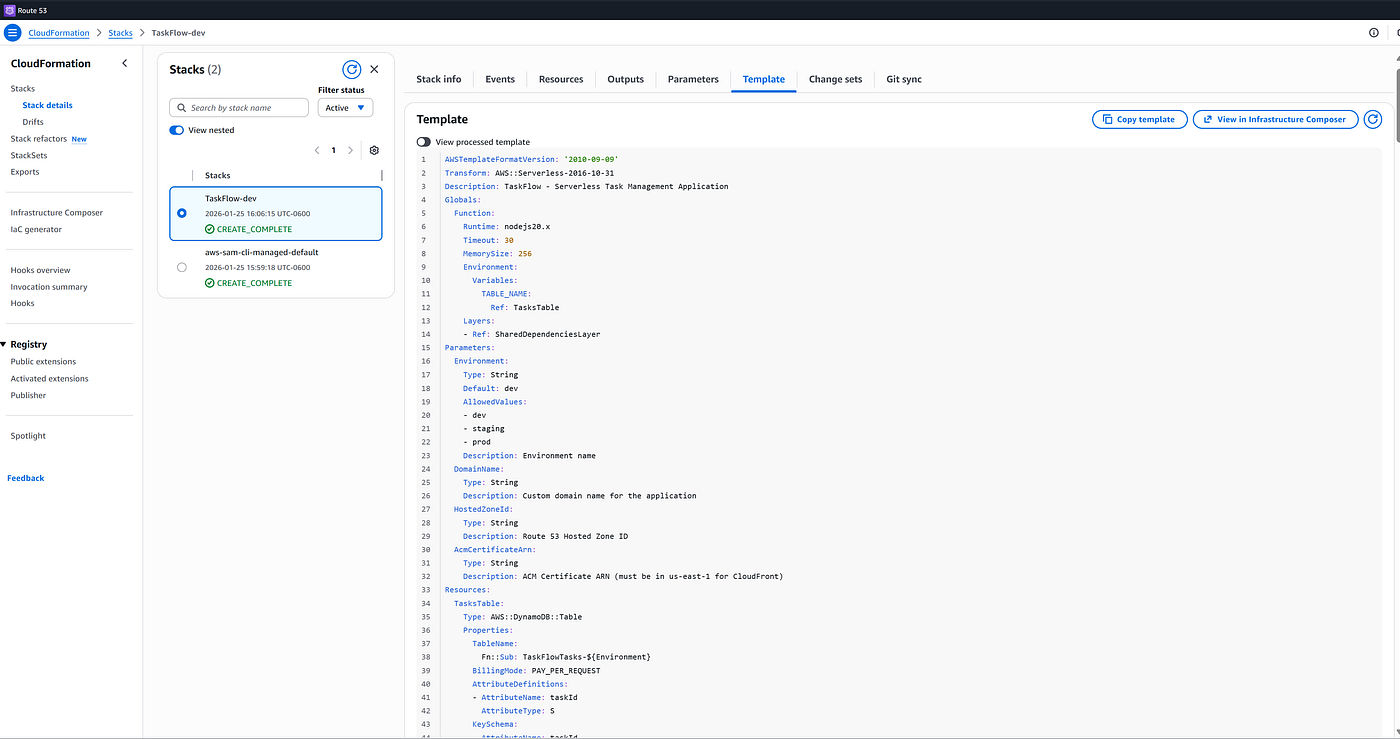
Key SAM Features Used
Globals— Shared configuration applied to all functionsAWS::Serverless::Function— Simplified Lambda definition- Policy Templates — Pre-built IAM policies like
DynamoDBCrudPolicy - Implicit API Events — Automatic API Gateway route creation
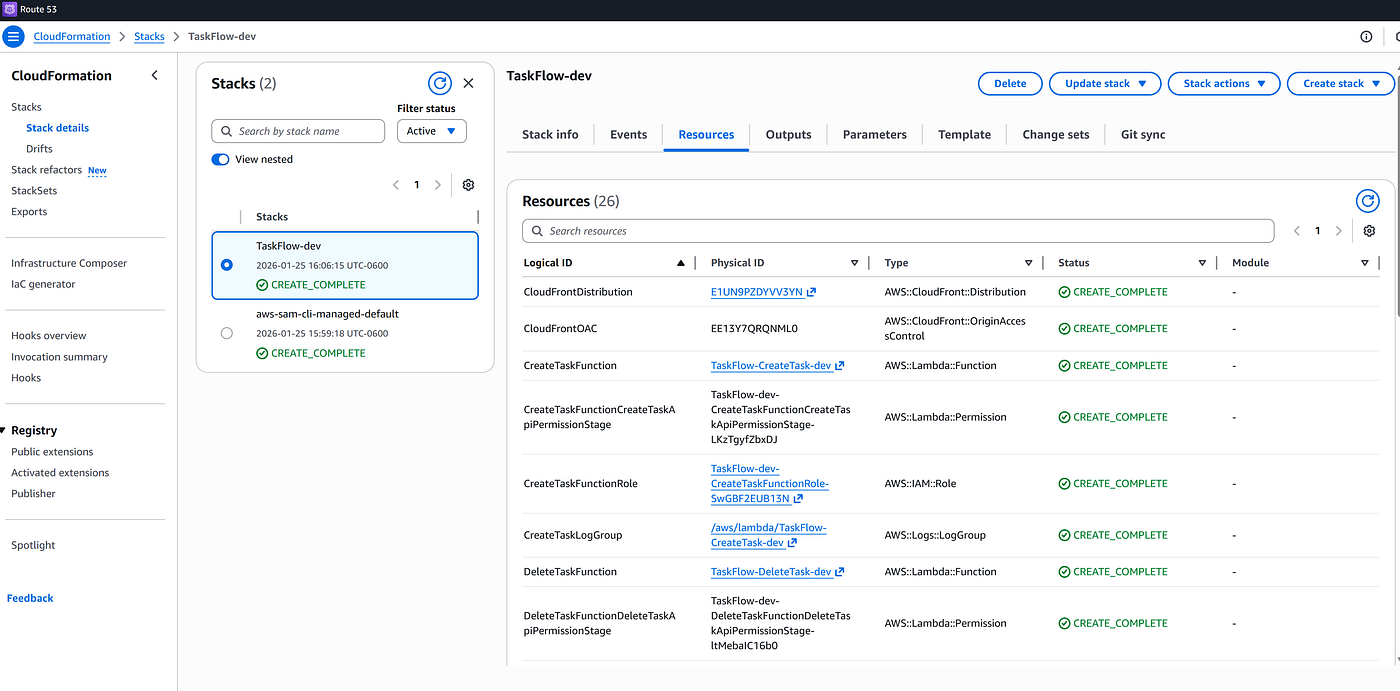
Step 2: Building Lambda Functions
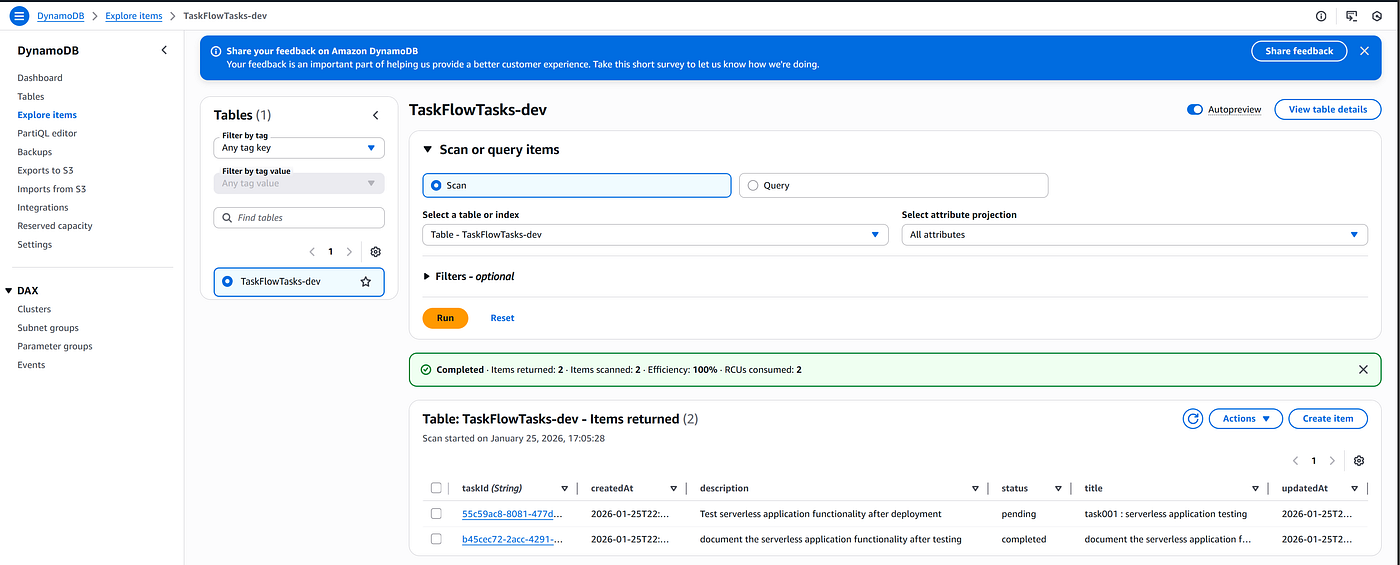
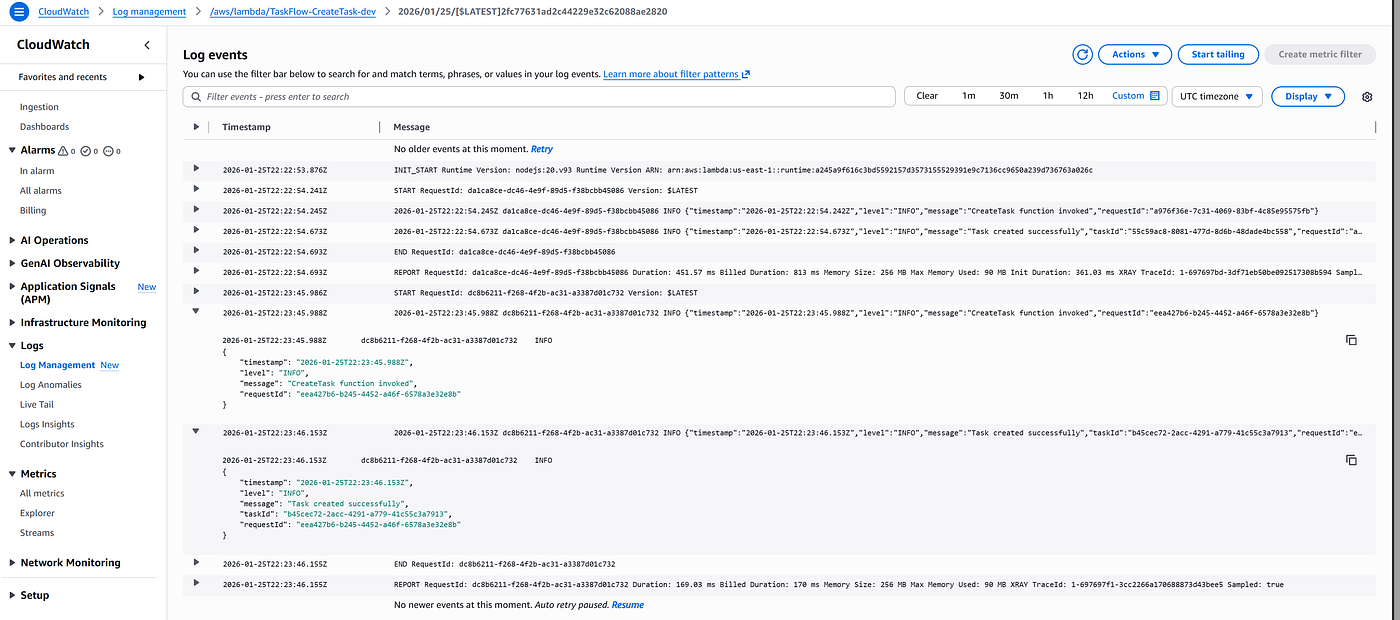
Each Lambda function handles a specific operation. Here’s the Create Task function:
// lambda/createTask/index.js
const { randomUUID } = require('crypto');
const { DynamoDBClient } = require('@aws-sdk/client-dynamodb');
const { PutCommand, DynamoDBDocumentClient } = require('@aws-sdk/lib-dynamodb');
const client = new DynamoDBClient({});
const docClient = DynamoDBDocumentClient.from(client);exports.handler = async (event) => {
  try {
    const body = JSON.parse(event.body || '{}');    // Validate input
    if (!body.title) {
      return {
        statusCode: 400,
        headers: { 'Content-Type': 'application/json' },
        body: JSON.stringify({ error: 'Title is required' })
      };
    }    // Create task object
    const task = {
      taskId: randomUUID(),
      title: body.title,
      description: body.description || '',
      status: 'pending',
      createdAt: new Date().toISOString(),
      updatedAt: new Date().toISOString()
    };    // Save to DynamoDB
    await docClient.send(new PutCommand({
      TableName: process.env.TABLE_NAME,
      Item: task
    }));    return {
      statusCode: 201,
      headers: {
        'Content-Type': 'application/json',
        'Access-Control-Allow-Origin': '*'
      },
      body: JSON.stringify({ success: true, data: task })
    };  } catch (error) {
    console.error('Error:', error);
    return {
      statusCode: 500,
      body: JSON.stringify({ error: 'Internal server error' })
    };
  }
};

CORS Configuration
When building APIs consumed by browser applications, CORS headers are essential:
headers: {
  'Content-Type': 'application/json',
  'Access-Control-Allow-Origin': '*',
  'Access-Control-Allow-Headers': 'Content-Type',
  'Access-Control-Allow-Methods': 'GET,POST,PUT,DELETE,OPTIONS'
}
Step 3: Building the Frontend
Modern Glassmorphism UI
The frontend uses a modern glassmorphism design with pure CSS:
.glass-card {
  background: rgba(255, 255, 255, 0.1);
  backdrop-filter: blur(20px);
  -webkit-backdrop-filter: blur(20px);
  border-radius: 16px;
  border: 1px solid rgba(255, 255, 255, 0.2);
  box-shadow: 0 8px 32px rgba(0, 0, 0, 0.1);
}+
API Client
A simple fetch wrapper handles all API calls:
// frontend/js/api.js
const API = {
  async createTask(taskData) {
    const response = await fetch(`${CONFIG.API_BASE_URL}/tasks`, {
      method: 'POST',
      headers: { 'Content-Type': 'application/json' },
      body: JSON.stringify(taskData)
    });
    if (!response.ok) throw new Error('Failed to create task');
    const data = await response.json();
    return data.data;
  },  async getTasks() {
    const response = await fetch(`${CONFIG.API_BASE_URL}/tasks`);
    if (!response.ok) throw new Error('Failed to fetch tasks');
    const data = await response.json();
    return data.data || [];
  }
  // ... other methods
};
Step 4: CloudFront and Custom Domain
Setting Up CloudFront
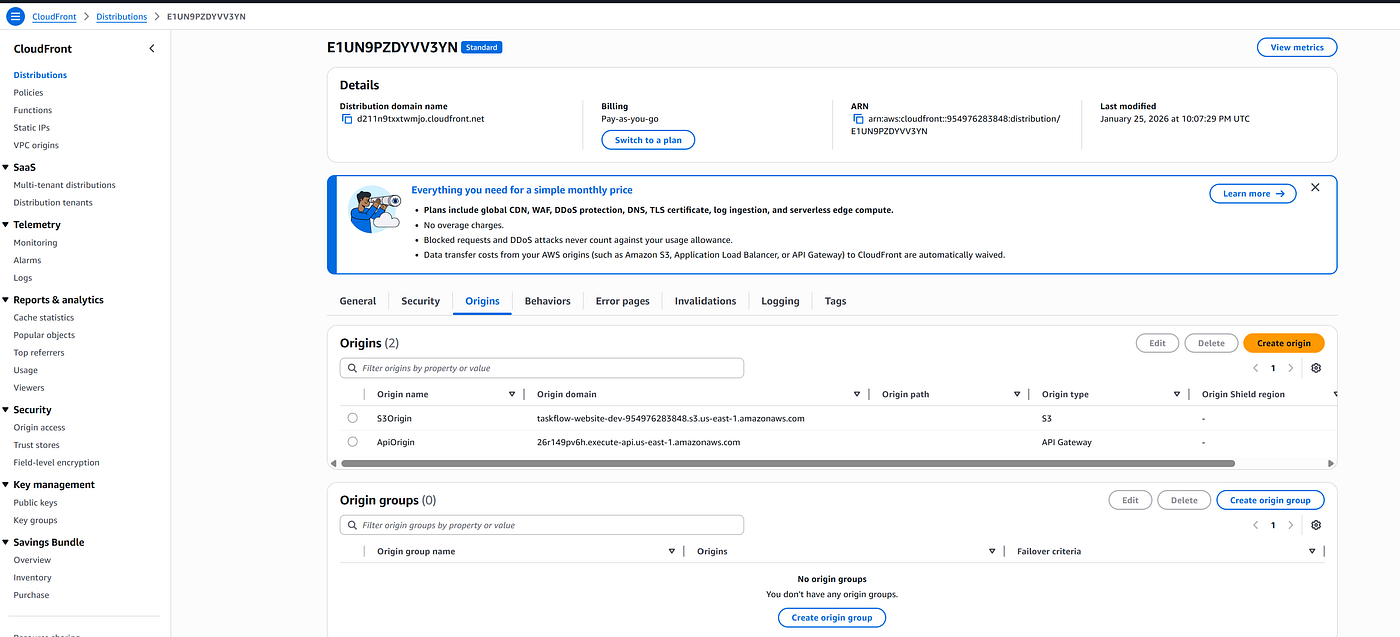
CloudFront provides global content delivery and SSL termination:
CloudFrontDistribution:
  Type: AWS::CloudFront::Distribution
  Properties:
    DistributionConfig:
      Enabled: true
      DefaultRootObject: index.html
      Aliases:
        - !Ref DomainName
      ViewerCertificate:
        AcmCertificateArn: !Ref AcmCertificateArn
        SslSupportMethod: sni-only
        MinimumProtocolVersion: TLSv1.2_2021
      Origins:
        - Id: S3Origin
          DomainName: !GetAtt WebsiteBucket.RegionalDomainName
          OriginAccessControlId: !Ref CloudFrontOAC
        - Id: ApiOrigin
          DomainName: !Sub ${TaskFlowApi}.execute-api.${AWS::Region}.amazonaws.com
          CustomOriginConfig:
            OriginProtocolPolicy: https-only
Route 53 DNS
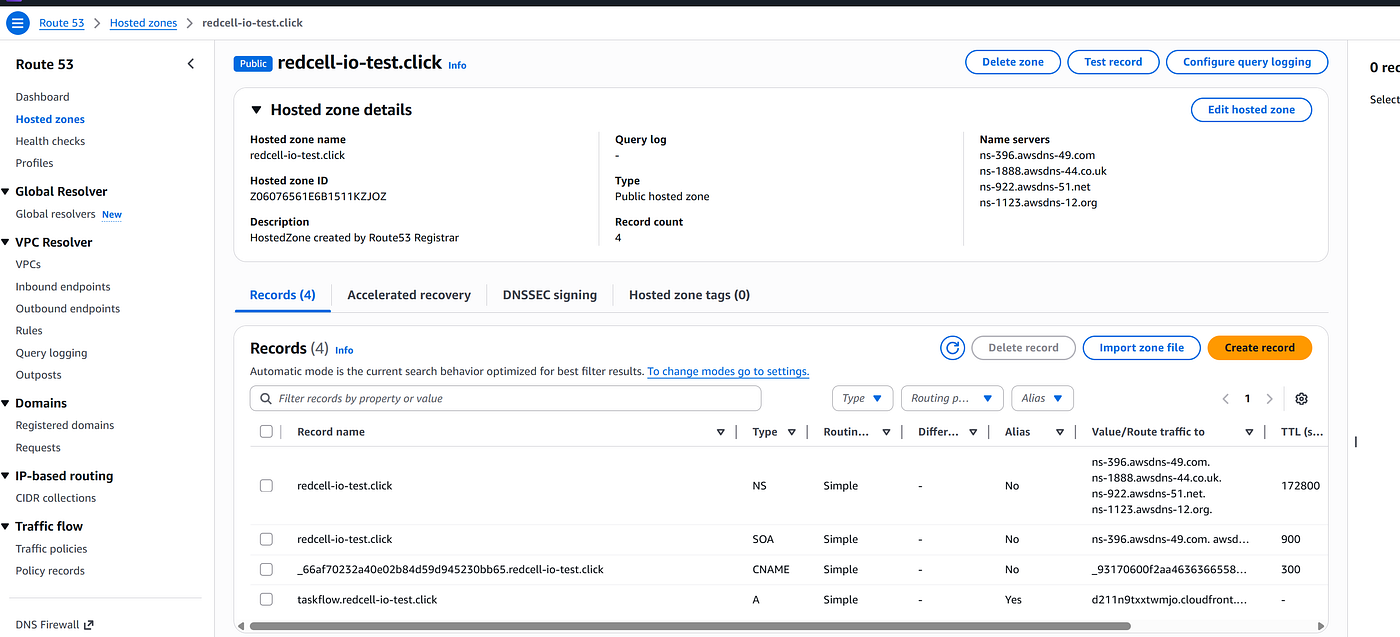
Connect your custom domain:
DnsRecord:
  Type: AWS::Route53::RecordSet
  Properties:
    HostedZoneId: !Ref HostedZoneId
    Name: !Ref DomainName
    Type: A
    AliasTarget:
      DNSName: !GetAtt CloudFrontDistribution.DomainName
      HostedZoneId: Z2FDTNDATAQYW2  # CloudFront's hosted zone\
Step 5: One-Command Deployment
The Deployment Script
I created a bash script that handles the entire deployment:
#!/bin/bash
# deploy.sh - Full deployment with frontend upload
# Load configuration
source .env# Build Lambda functions
sam build# Deploy infrastructure
sam deploy \
    --stack-name "TaskFlow-$ENVIRONMENT" \
    --capabilities CAPABILITY_IAM \
    --parameter-overrides \
        "Environment=$ENVIRONMENT" \
        "DomainName=$DOMAIN_NAME" \
        "HostedZoneId=$HOSTED_ZONE_ID" \
        "AcmCertificateArn=$ACM_CERTIFICATE_ARN" \
    --resolve-s3# Get outputs
S3_BUCKET=$(aws cloudformation describe-stacks \
    --stack-name "TaskFlow-$ENVIRONMENT" \
    --query "Stacks[0].Outputs[?OutputKey=='WebsiteBucketName'].OutputValue" \
    --output text)API_ENDPOINT=$(aws cloudformation describe-stacks \
    --stack-name "TaskFlow-$ENVIRONMENT" \
    --query "Stacks[0].Outputs[?OutputKey=='ApiEndpoint'].OutputValue" \
    --output text)# Update frontend config
sed -i "s|API_BASE_URL:.*|API_BASE_URL: '$API_ENDPOINT',|" frontend/js/config.js# Upload frontend
aws s3 sync frontend/ "s3://$S3_BUCKET/" --delete# Invalidate CloudFront cache
aws cloudfront create-invalidation \
    --distribution-id "$CF_DISTRIBUTION" \
    --paths "/*"echo "Deployed to https://$DOMAIN_NAME"
Now deployment is just:
./deploy.sh
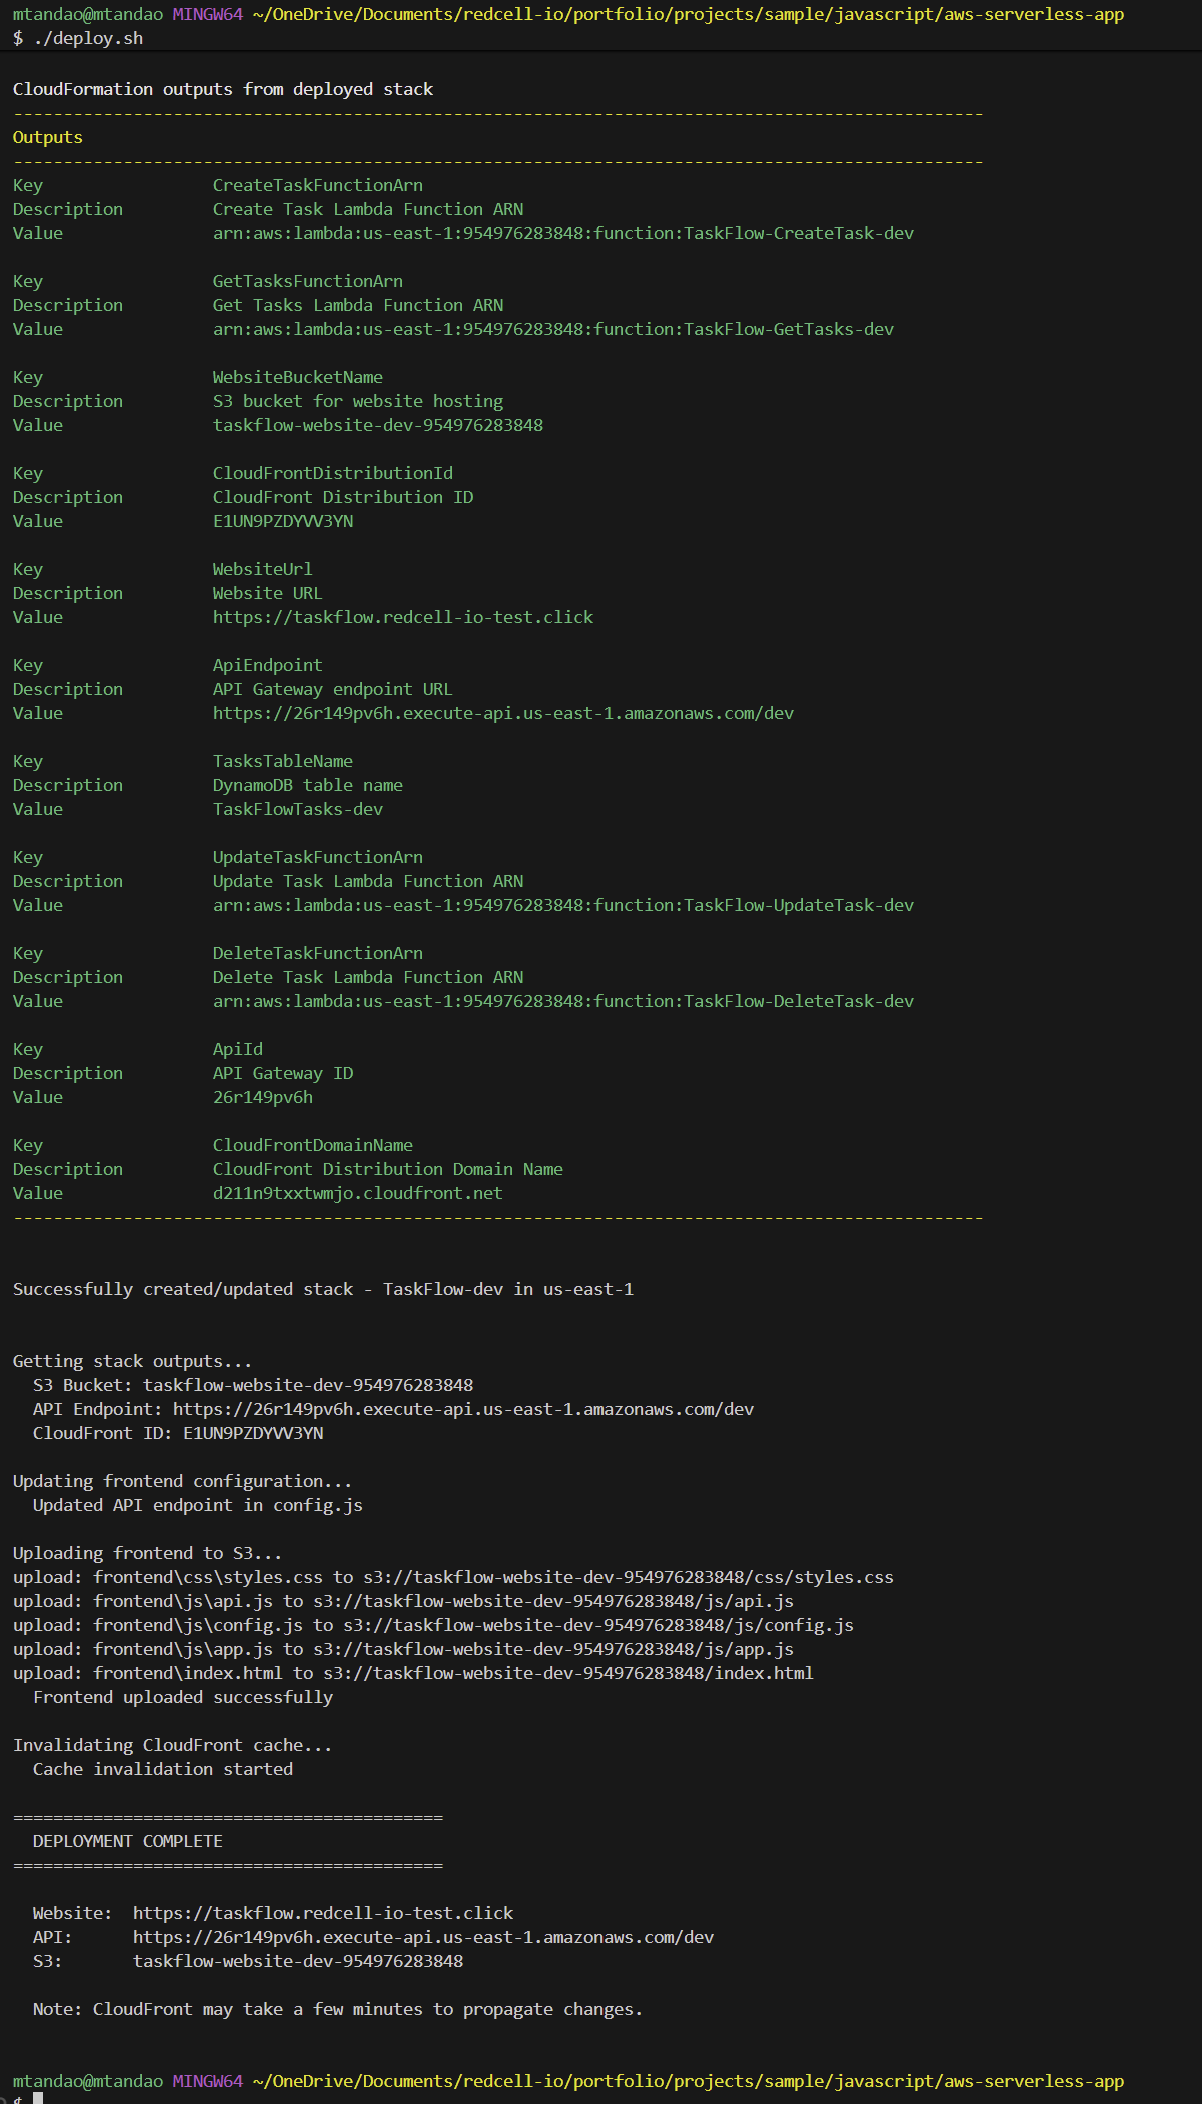
Deployment Process
1. Load environment variables (.env)
   ↓
2. SAM Build
   - Package Lambda functions
   - Validate template
   ↓
3. SAM Deploy
   - Upload artifacts to S3
   - Create/Update CloudFormation stack
   - Deploy all resources
   ↓
4. Get Stack Outputs
   - S3 bucket name
   - API endpoint
   - CloudFront ID
   ↓
5. Update Frontend Config
   - Set API endpoint
   ↓
6. Upload Frontend to S3
   ↓
7. Invalidate CloudFront Cache
Step 6: Cost Breakdown
One of the biggest advantages of serverless is cost efficiency:
Service10K requests/month100K requests/monthLambdaFree tier~$0.20API Gateway~$0.04~$0.35DynamoDBFree tier~$0.25S3~$0.01~$0.05CloudFront~$0.10~$1.00Route 53$0.50$0.50Total~$0.65~$2.35
For a side project or MVP, you’re looking at less than a coffee per month!
Lessons Learned
1. Lambda Layers vs. Bundled Dependencies
Initially, I used Lambda Layers for shared code. However, the relative import paths (../shared/) don’t work with how SAM packages functions.
Solution: Copy shared code into each function directory and use local imports (./shared/).
2. CORS Configuration
CORS must be configured at multiple levels:
- API Gateway (OPTIONS preflight)
- Lambda responses (headers)
- CloudFront (for API passthrough)
3. CloudFront Cache Invalidation
After updating the frontend, always invalidate the CloudFront cache:
aws cloudfront create-invalidation \
    --distribution-id $CF_ID \
    --paths "/*"
4. Environment Variable Handling in Bash
Special characters in AWS secret keys (like / and +) can cause issues with simple env parsing. Use source .env with explicit exports.
What’s Next?
Future enhancements could include:
- User Authentication with Amazon Cognito
- Real-time Updates using WebSocket API
- Search and Filtering with DynamoDB GSI
- CI/CD Pipeline with AWS CodePipeline
- Monitoring Dashboard with CloudWatch
Conclusion
Building serverless applications on AWS has never been easier. With SAM, you can define your entire infrastructure in a single YAML file and deploy with one command.
The key benefits:
- Zero server management — Focus on code, not infrastructure
- Automatic scaling — From 0 to millions of requests
- Cost efficiency — Pay only for what you use
- Fast iteration — Deploy changes in minutes
You can find the complete source code on GitHub.
Tags
#AWS #Serverless #Lambda #SAM #CloudFormation #DynamoDB #JavaScript #WebDevelopment #CloudComputing #Tutorial
Resources
If you found this helpful, please give it a clap and follow for more AWS and serverless content!